Introduction to Get Metadata in Azure Data Factory
Joel Cochran
Azure, Data, Data Factory, ETL, ADF, Synapse
October 19, 2021
Introduction to Get Metadata in Azure Data Factory
Introduction
Azure Data Factory (ADF) (1) and Synapse Pipelines are fully cloud hosted, enterprise-grade, ETL/ELT engines operating at hyper scale. The connectors are many and varied, but most often we find ourselves needing the basics, like Azure Blob Storage (2). As Azure Data Engineers, we rely heavily on Storage accounts to ingest, store, and stage data. Frequently, we need to perform discovery over the contents of Storage locations. In this article, we will examine how to use ADF’s Get Metadata Activity to perform this task.
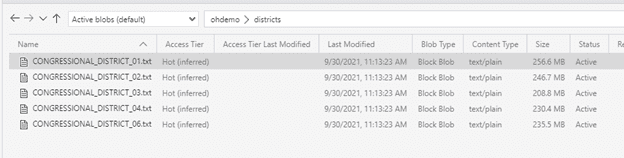
For our demos, we will be referring to the following storage container and folder:
Get Metadata Basics
For the purposes of this article, I’ll assume you already have a Linked Service (3) created for your Storage account, either Blob Storage or Azure Data Lake Storage Gen2 (ADLS), so let’s begin by creating a Dataset. In a previous article (4), I demonstrated how to create Datasets with dynamic components. We’re going to leverage those concepts here and use a Dataset that references a dynamic container and folder (or directory):
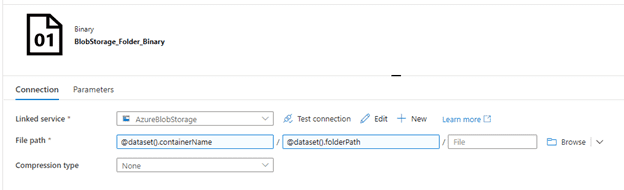
Since our operation does not require any references to the underlying schema, we have chosen to use a Binary Dataset. With this Dataset, we can use a Get Metadata activity in our pipeline to gather information about the items in question.
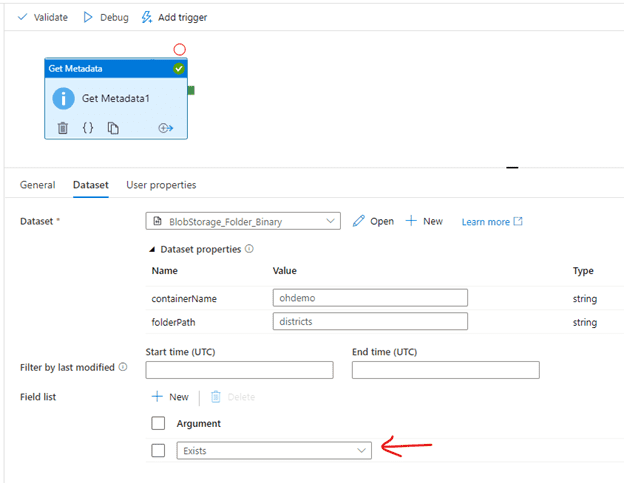
When configuring a Get Metadata activity, you must specify what kind of metadata you wish to retrieve by updating the Field list selection:

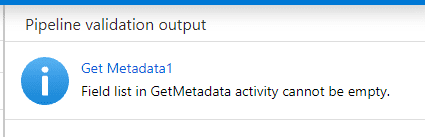
By default, no fields are selected, which produces a Validation error:
Click the “New” button to reveal the “Argument” options:

You may add multiple fields by adding multiple Argument entries.
Checking whether an item Exists
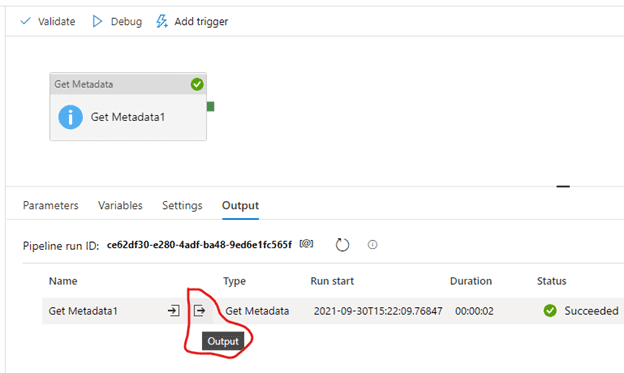
For our first example, let’s verify that the Container and Folder exist. We’ll add an Exists Argument to the Field list:
Let’s run this in DEBUG mode and click on the Output button:
The key to figuring out how to work with many activities is to examine the JSON return object. Here is the JSON from this activity:
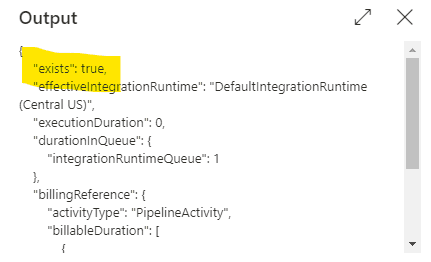
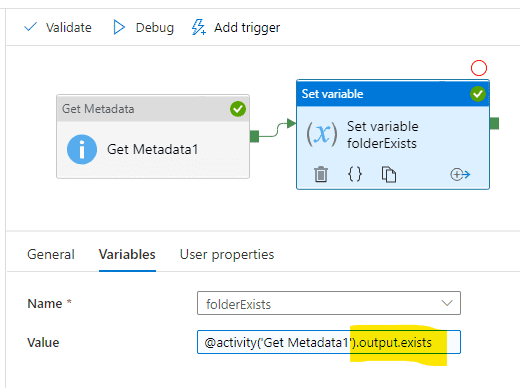
The requested Arguments are returned as properties, so let’s add a simple Boolean variable to capture referencing the object’s exists property:
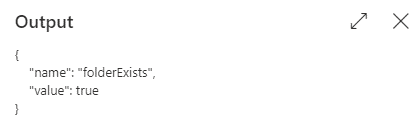
And back in the Output panel we can view the results:
Let’s add an If conditional activity based on this value:
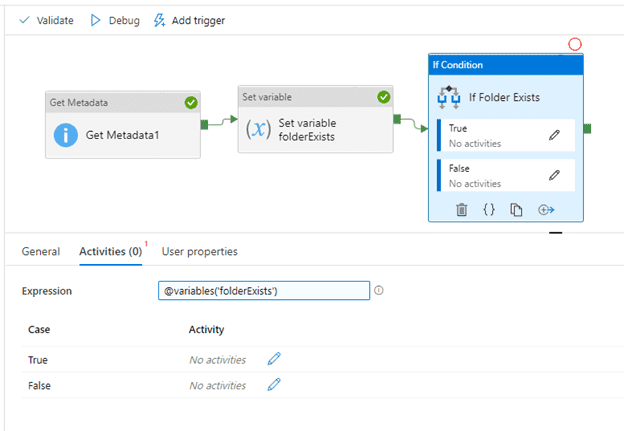
Of course, the interim variable is not required, but I find it can improve readability and makes for a good demonstration.
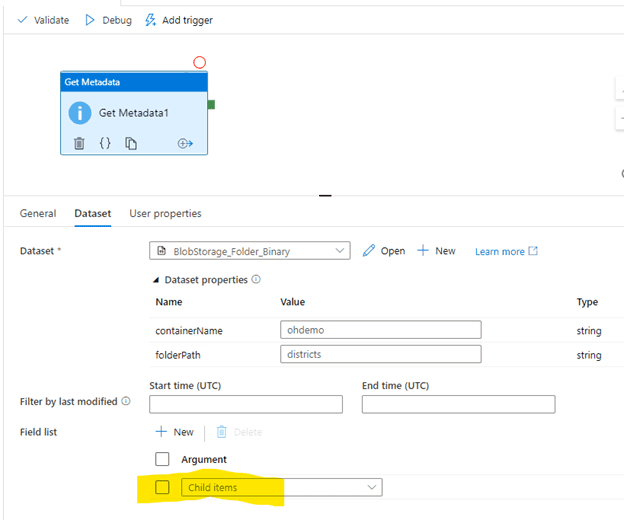
Listing the Items
Probably the most frequent use case we encounter for Get Metadata is the need to examine the contents of a folder. Here I’ve started a new pipeline and selected the Child items Argument in the field list:
Let’s run this in Debug and examine the JSON:
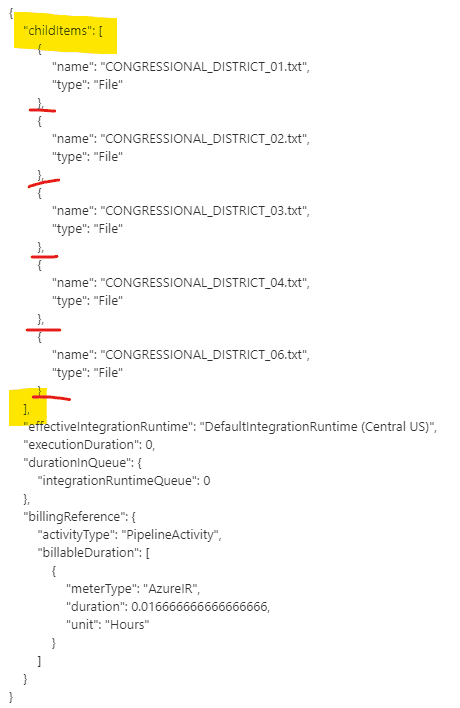
Now our return object includes a property named childItems that is an array of JSON objects. Each object in the array represents a file or folder in the location. As you can see, the object details are limited to the name and type of the item.
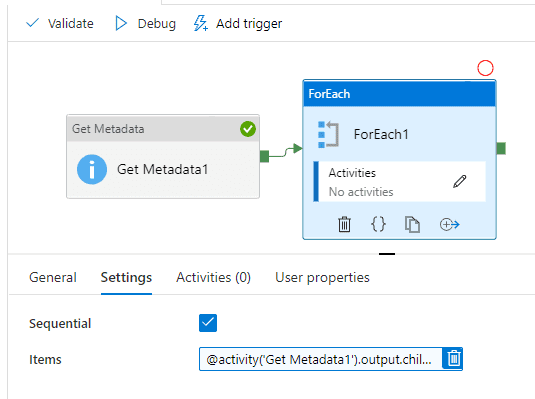
Let’s use this array to drive a ForEach activity so we can loop over the contents:
The UI cuts it off, but the Expression Builder shows the entire path:
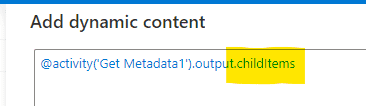
Just as we did previously with exists, we’re referencing the childItems Argument. Unfortunately, there is no code completion to assist with this task, so you’ll have to enter it manually.
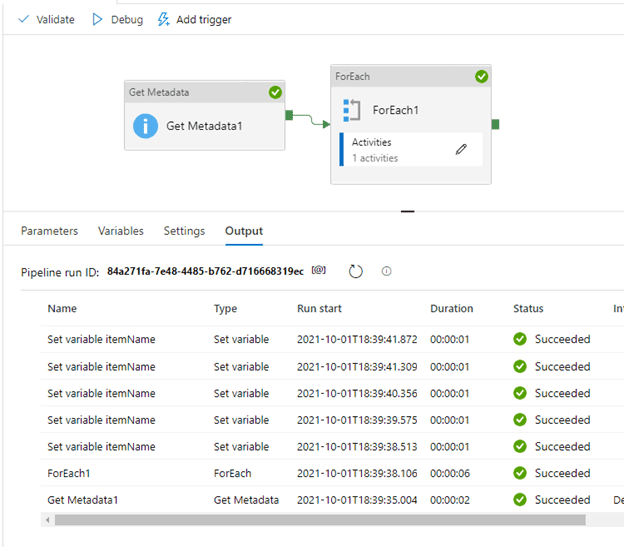
You should also note that we’ve checked the Sequential box on the ForEach activity. The default is unchecked, so this is very important. We’re going to use a pipeline variable inside the ForEach o capture the item name. Since pipeline variables are always global, if you do not run this operation sequentially, you won’t be able to guarantee which item the variable currently references. With Sequential checked, only one iteration will run simultaneously, so you won’t step on yourself.
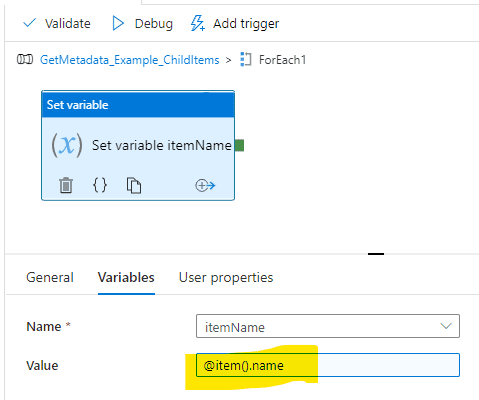
Inside the ForEach, you reference the current iteration by using the item() function. This will return the current JSON object from the array, so to get the file name, use item().name:
Let’s run this again in DEBUG and investigate the results:
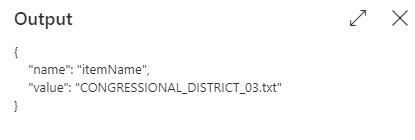
Select any of the Set variable activities to view the variable value:
So now you have a handle on the item name, which works the same for Folders. But what happens to my process when we encounter both folders and files? That’s why we use Filter!
Filtering Results
Many times, a folder will contain both folders and files. In our case, the process is only designed to operate over TXT files, so it would break if it encountered something else. And before you think your situation is immune from this, beware: there are many times when people or processes put things in the wrong place, or automated tools leave behind undesired artifacts. Regardless of your situation, it’s a safe practice to explicitly filter your Get Metadata results to ensure you only process what you intend to process. Enter the Filter activity.
Filter is a great companion to Get Metadata. Since it operates over an array, the childItems property is a natural fit. Remember, however, that the item objects are limited to name and type. We’re going to leverage both of these to ensure we only process TXT files. Let’s start by adding a Filter activity between the Get Metadata and ForEach activities:
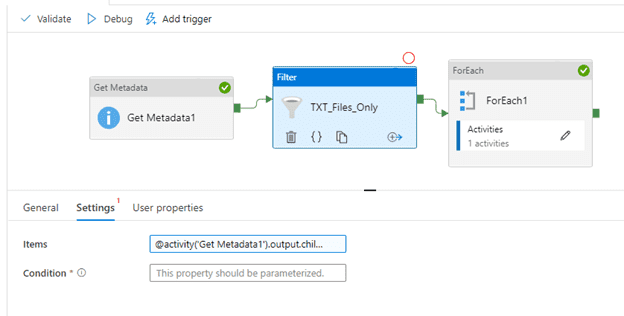
The Items setting is the same reference to the childItems we used in the ForEach activity previously. The Condition setting is where the magic happens. We’ll start by requiring the item type to be a File:
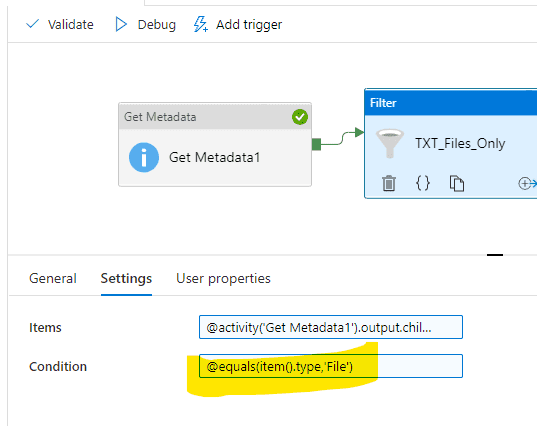
NOTE: One thing you won’t find in this scenario, again, is code completion assistance. You will need to manually add any references to the item() function.
If you aren’t familiar with it, the Pipeline Expression Language (5) can get a little verbose, but in this example we’re just leveraging the equals (6) function to compare two strings. Run DEBUG again and investigate the Filter activity’s return object:
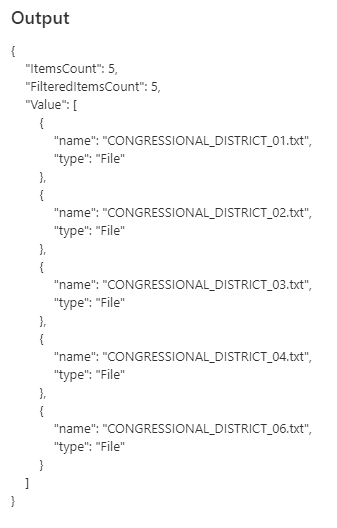
Had there been folders in this location, they would be included in Get Metadata but not this Filter. And of course, you could use this same approach to only return Folders by changing the type comparison to ‘Folder’. And you are not limited to just one condition: let’s return to the Filter condition and update the expression to also limit the files to items ending with “.txt”:
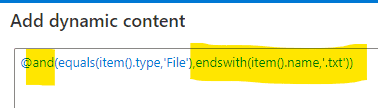
To accomplish this, we’ve wrapped our previous equals function with an and (7) function so both conditions must be true. If our list contained a CSV file, for instance, it would now be excluded. And of course, you have many additional expressions you can bring to bear. Regardless, Filter and Get Metadata make a powerful combination.
There is one final change we need to make to complete our example. The ForEach activity previously referenced Get Metadata, but now we want it to iterate over the Filter results:
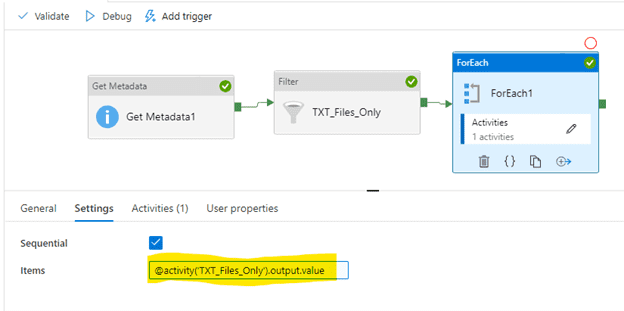
If you refer to the Output results for the Filter object, the reference here should make sense: we are referring to the output’s Value property, which is the array of filtered items.
Final Thoughts
Let’s quickly review where we ended up.
- The Get Metadata activity lists all the items in location. Our example used Storage, but SFTP is another common use case.
- The Filter activity helps us ensure we are only processing the items we intend.
- The ForEach activity loops over those results and operates on each individual item.
Granted, our example didn’t really do anything more than grab item names. So what’s next? Some common next steps would be to add additional activities inside the ForEach (like a Copy Activity), call a Stored Procedure, or execute another pipeline. In the last two cases, you now have more granular data points to send as parameters.
And of course, it depends on what you are processing. ADF doesn’t support recursive pipeline calls, so you may find it challenging to process deeply nested folder structures. Regardless of where your journey takes you next, I hope you found this a useful beginning.
To learn more, visit Causeway Solutions to get started!